By the time you’re finished with this blog post, you’ll have your own custom website built, published and ready to roll—in just 30 minutes and for less than $40, even if you have zero tech skills whatsoever.
When I built my first couple of websites 11 years ago, it was a nightmare.
The first site I built got shut down.
My second website was built on an obsolete platform, so I never had a chance in hell of earning any money from all my hard work on it.
My third website was also built on an outdated platform, so again, I couldn’t earn any real money from it.
For my fourth website, I paid a firm $8,000 to build it for me—and they left me with a half-working website, a lot of broken promises, and no cash left in the bank.
Yes, I am an idiot… but eventually I learned how to build a website quickly and easily for less than $40!

How to Build a WordPress Website and Blog for Free
After I went through years of website-induced stress and four disasters, I finally figured out how to build a high quality, professional website for less than $50—and I’m going to teach you how to do it right now for free.
I don’t want anyone else to waste three years of their life and more than $8,000 like I did trying to figure this stuff out.
If you have an important message, story, product, or service to share with the world online, I want to show you how to do it as quickly, easily and painlessly as possible so you can help more people.
All I ask in return is that you do your best to make the world a better place with your work. Sound fair?
Great! Then let’s start building your website right now.
1. Buy a Domain Name
Total Cost: Less than $10 per year
Your first step to creating a website is to buy a domain name.
A domain name is the web address that people type in to find your site. Our domain name is tckpublishing.com—it’s the actual address of your website that appears in the address bar at the top of your web browser (also called a URL bar or location bar).
How to Buy a Domain Name for Your Website
First, go to www.godaddy.com to buy a domain name.
(I like GoDaddy because they have 24/7 customer support, and that means I can call them and get help anytime I have a tech problem or issue. For me, having technical support experts on call all day every day is priceless.)
Now it’s time to think of a domain name.
It’s tricky because you need to find a domain name that hasn’t been taken yet. It may take you five minutes, or a few hours, or a couple of days if you’re really picky to find the right domain name.
The first thing to check is your name. If you can’t find a website ending in .com with the exact spelling of your first and last name, considering adding in a middle initial or just getting another domain name extension like a .net. or .biz.
If you absolutely must have a .com site, I recommend just buy any .com you think is a good enough name to begin with and set it up now. You can always get a better domain name later for a few bucks, so you really should not be stressing about your first domain name.
You can also simply migrate your website to a new domain name later for free with the push of a button. That means if you buy a domain name now, build your website, get tons of traffic and customers, and then later decide you want to move your entire website over to a different domain name, you can do so with almost no interruption or lost traffic.
Search Domain Names
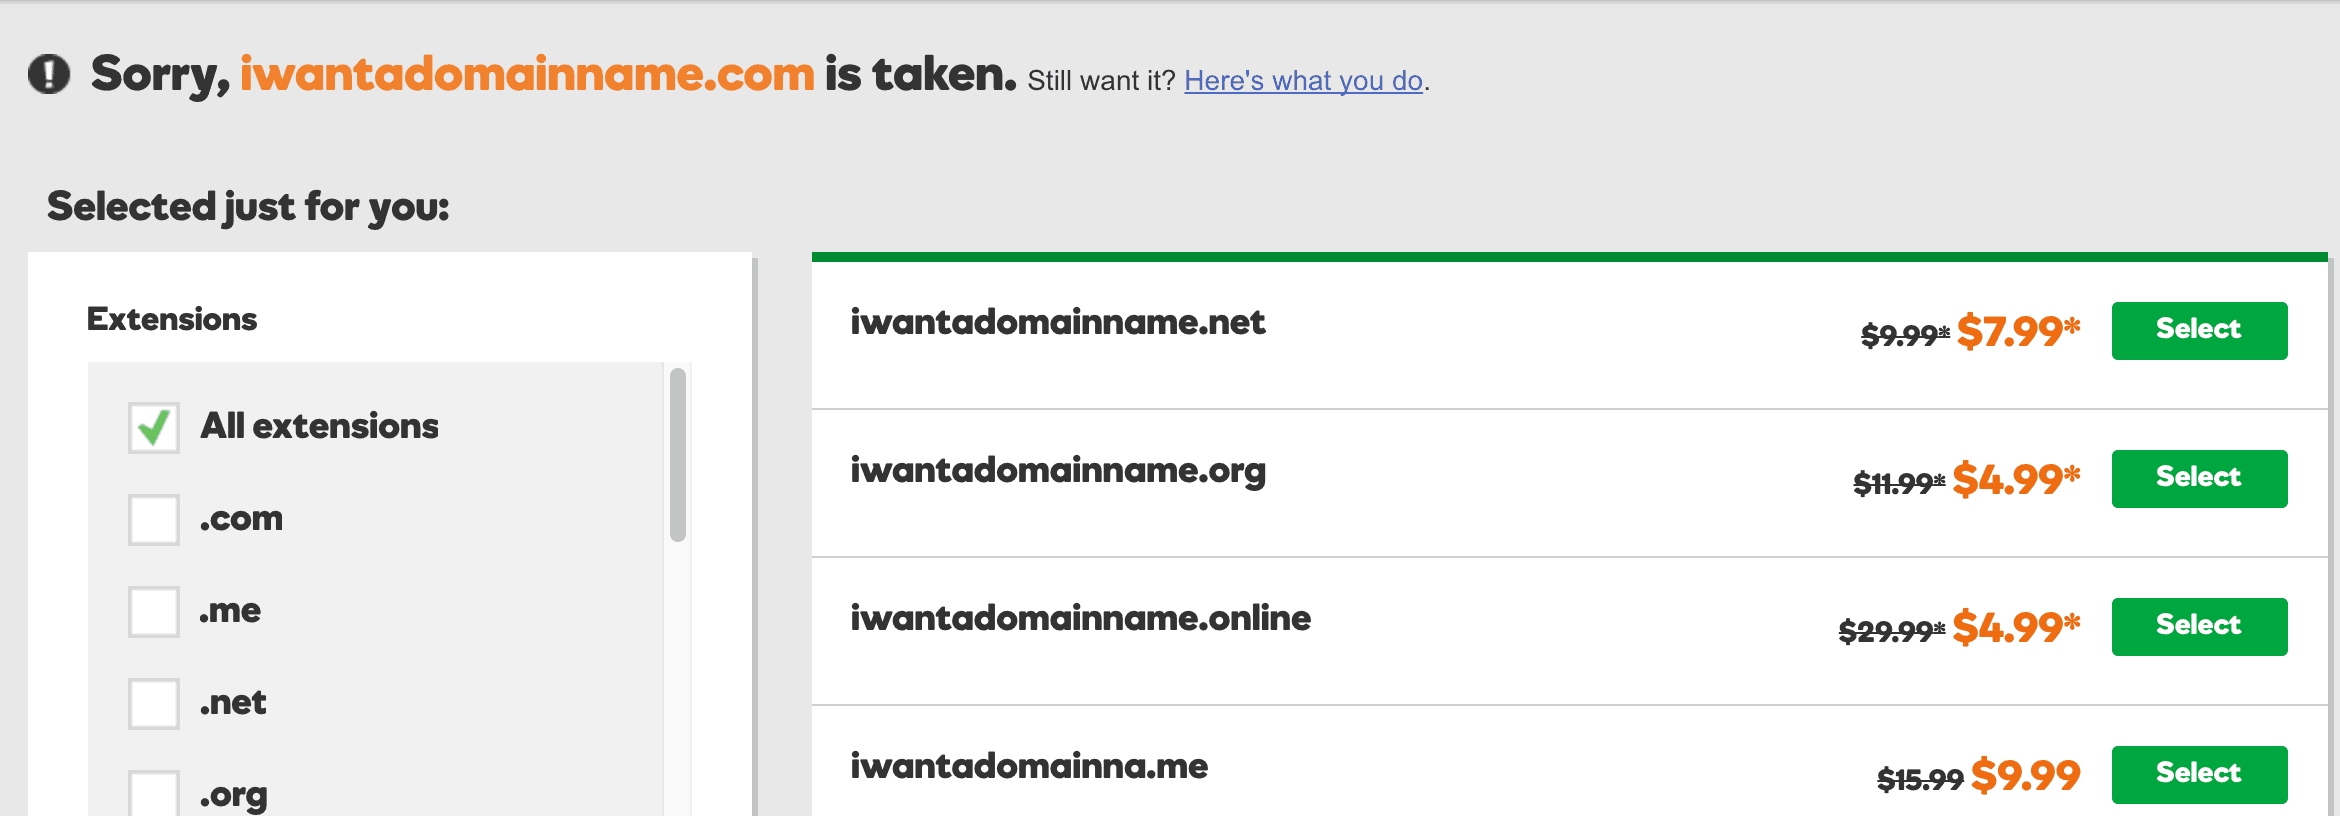
Once you think of a domain name you like, just enter it in the text box below the Godaddy logo and click on Search Domain.

If the name is already taken it will say, “Sorry, that domainyouwanted.com is taken.”
If the domain name is available, it will say “Yes! Your domain is available. Buy it before someone else does.”
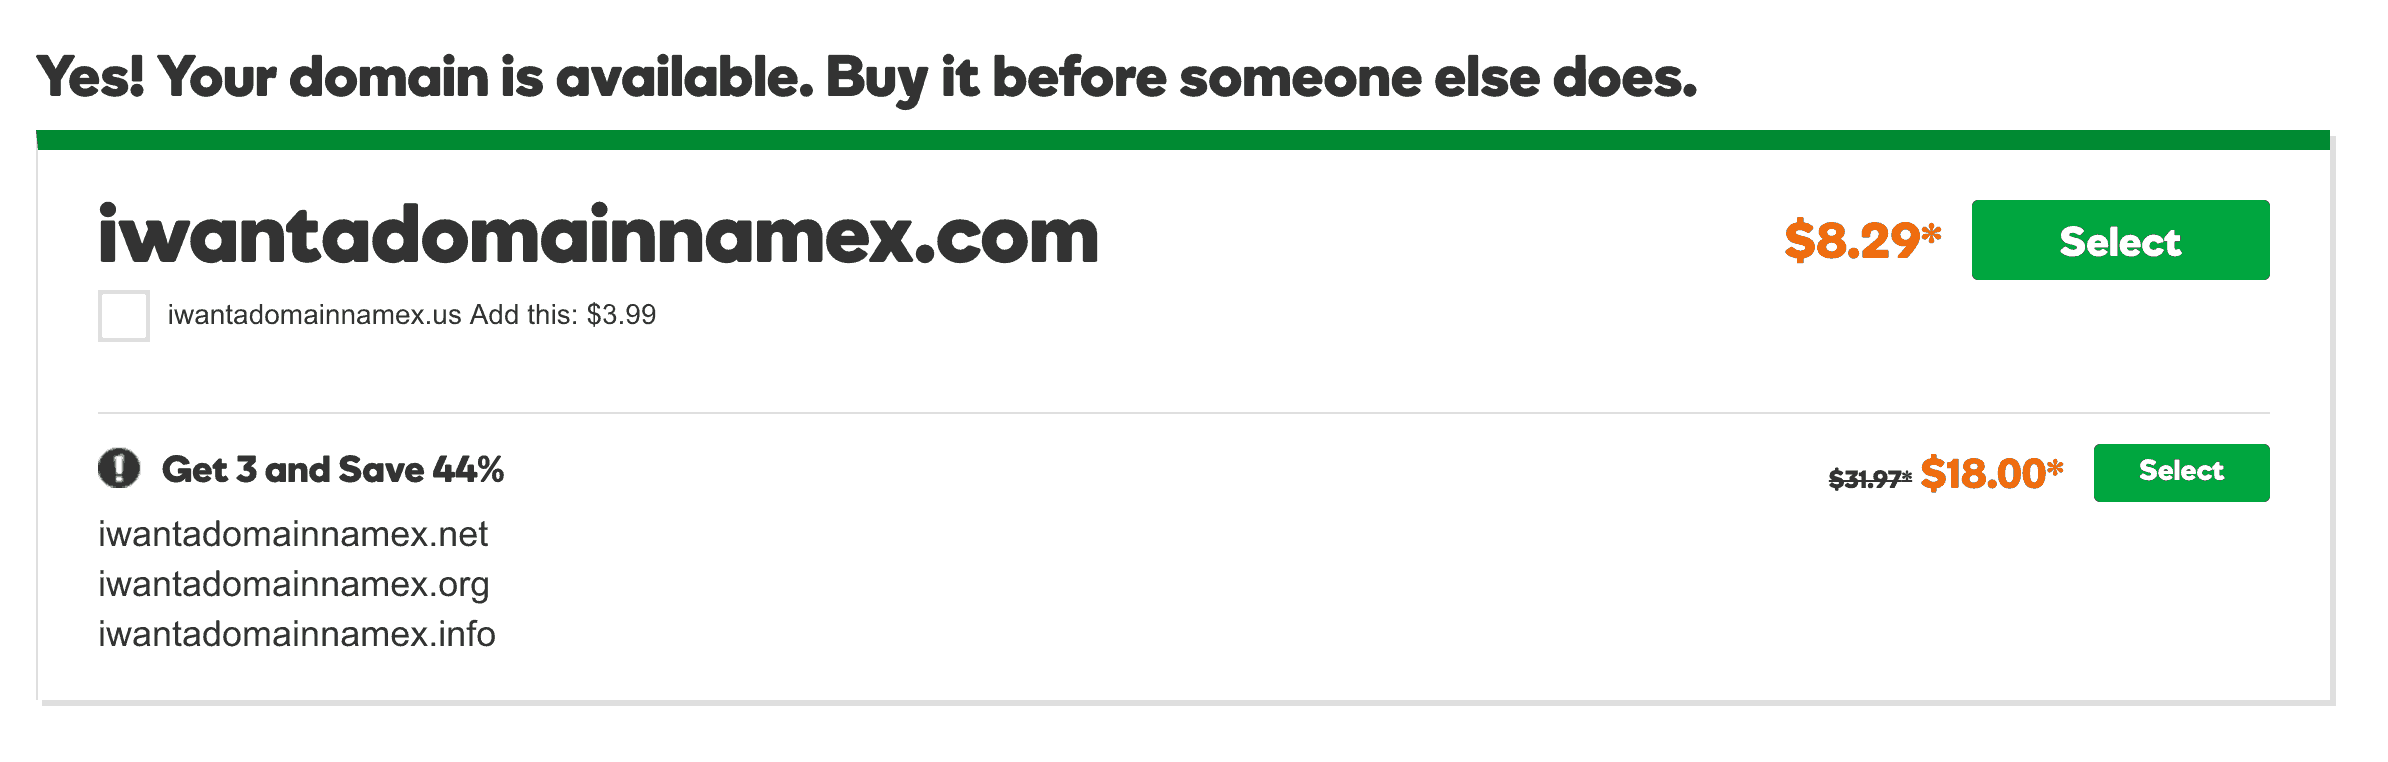
Select Your Domain Name
The next step is to choose the exact domain name you want, click on the Select button next to it, and then click on Continue to Cart.
Continue to Check Out
After clicking on Continue to Cart, it will bring you to the screen that asks, “What will you do with your domain name?”
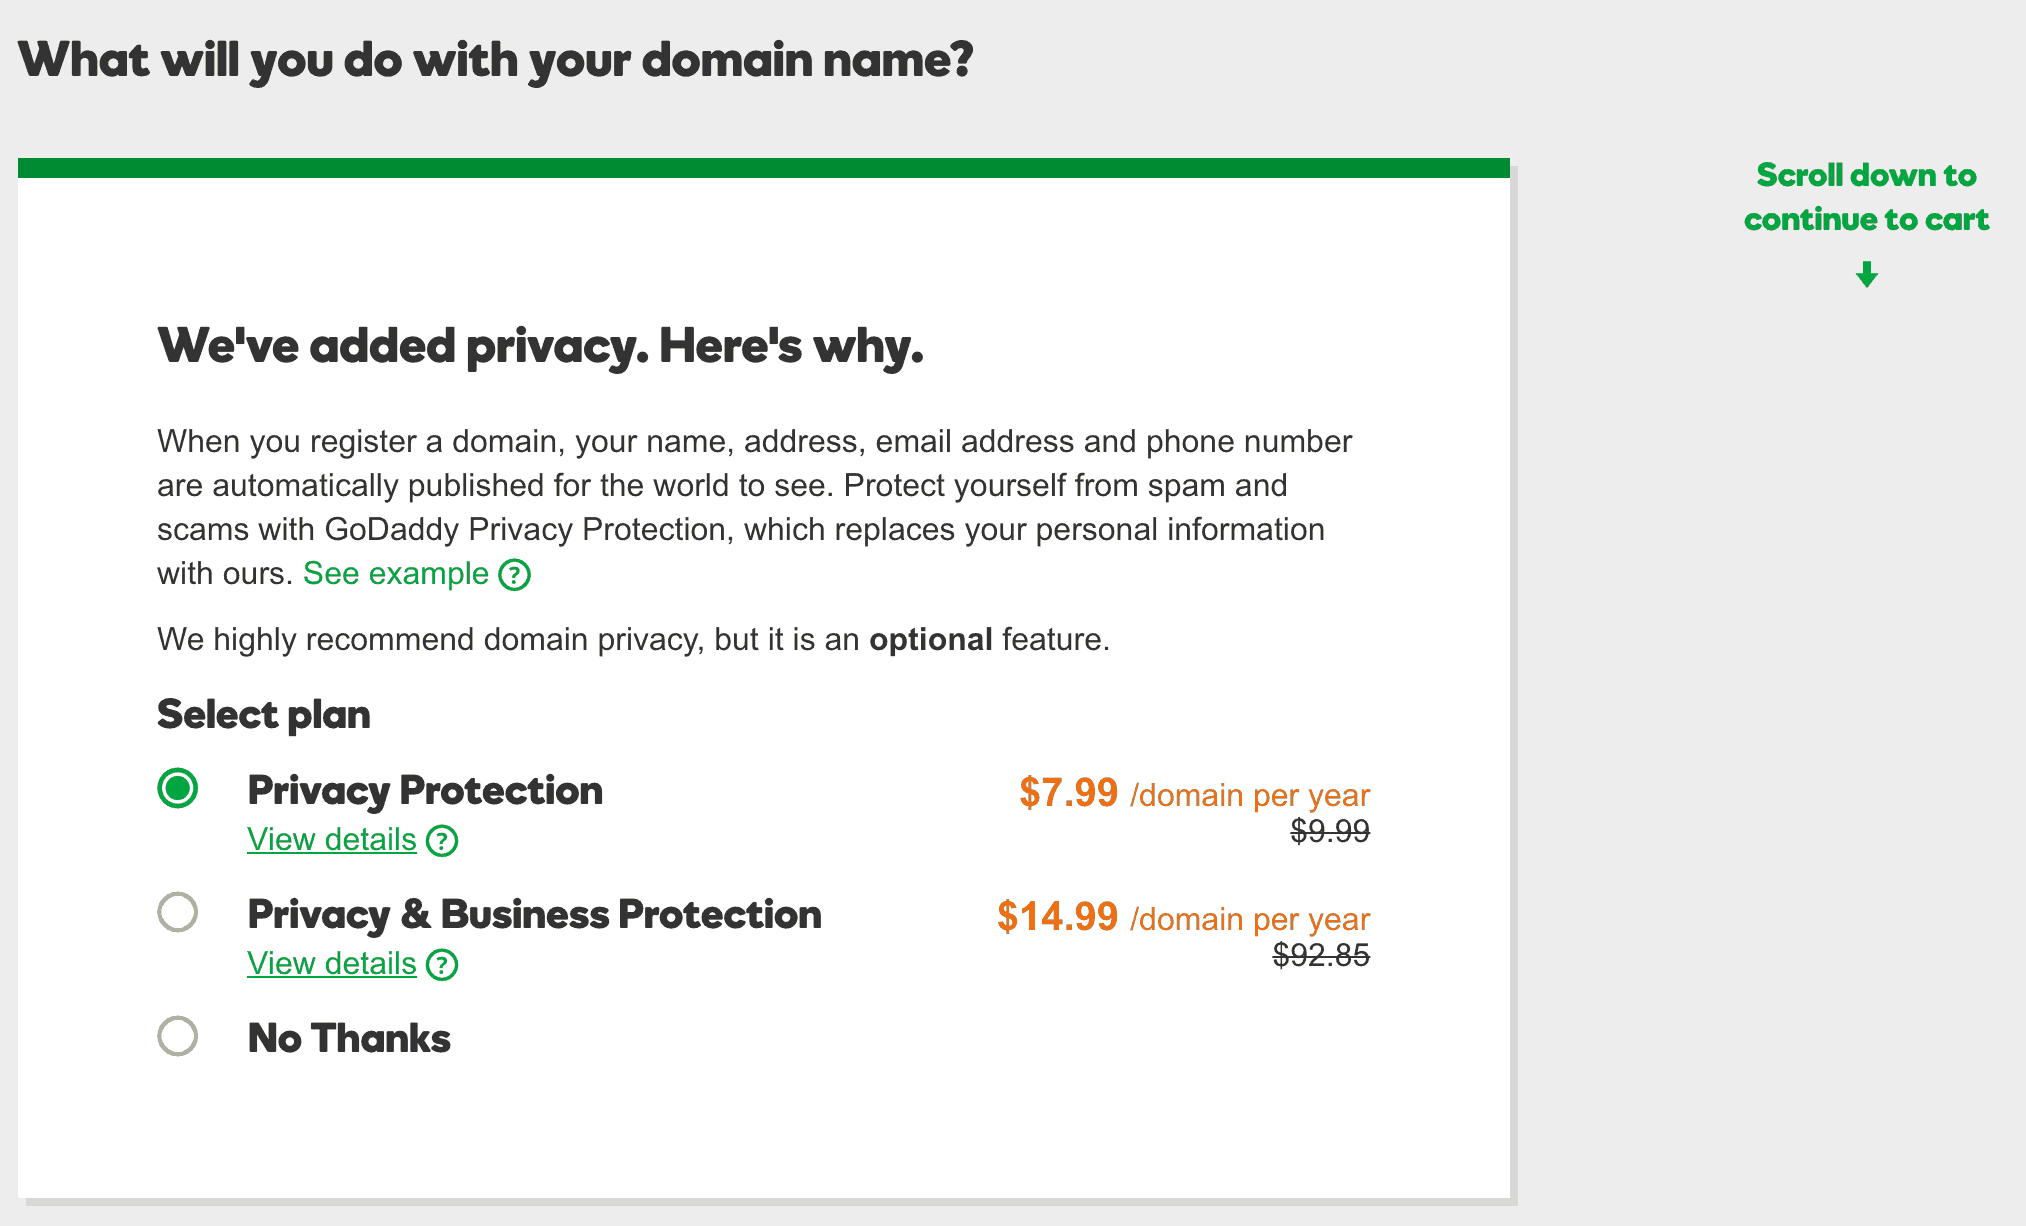
Skip the Upsells and Additional Offers
The next screen offers additional options and upsells including domain privacy options. At least 95% of folks really have no need for the privacy options or additional domains, so don’t bother buying them unless you’re sure you need all that extra stuff.
Once completed, click the button on the bottom that says Continue with these options.
Finish Checkout
The last page is the checkout page where you can review your selection.
Note: Last time I checked, GoDaddy automatically added a 5-year term on the domain name purchase and domain privacy. If you don’t want those options, you can just change the term and remove the privacy subscription on this page.
Once you’re satisfied with the domain name and the options you have chosen, simply click on Proceed to Checkout to purchase the domain.
After You Buy a Domain Name…
Congratulations! You are now the proud owner of a new website domain. Your internet fame is just beginning.
Once you have purchased your domain name, it’s time to get a web hosting service so you can actually host your website at your brand new web address.
Don’t worry, it’s really easy to do, and it costs less than lunch.
2. Set Up Web Hosting
Web hosting is where you pay a company to store all your website files and data so that other folks on the internet can visit your site.
Web hosts store all the files, images, videos, and text—literally everything on your website.
Buying web hosting is a lot like buying storage space; the company keeps all your stuff organized and safe in one place. They can also provide tech support and walk you through the process of purchasing domain names, web hosting, and building your site if you ever feel lost or confused.
Bluehost is the first company I used for hosting my websites.
Why You Need Your Own Web Hosting
There are also free blogs like Tumblr.com and Blogger.com, but you can never really monetize those websites nearly as effectively because of certain rules and regulations. For instance, you can’t post affiliate links or have opt in forms on many of these free websites unless you have your own web hosting.
If you’re serious about building a loyal following online and/or selling products or services, you absolutely need to own your own domain and have your own web hosting. Relying on a free third-party service for your website is a big mistake if you’re serious about creating a website that will meet your business and career goals.
So, I’m going to teach you how to set up your own custom website and blog using WordPress—it’s a 100% free software package that does all the hard work for you. And you can install it in just 5 minutes!
How to Get Web Hosting with BlueHost
Let’s start by going to www.bluehost.com.
Click on get started now to sign up.
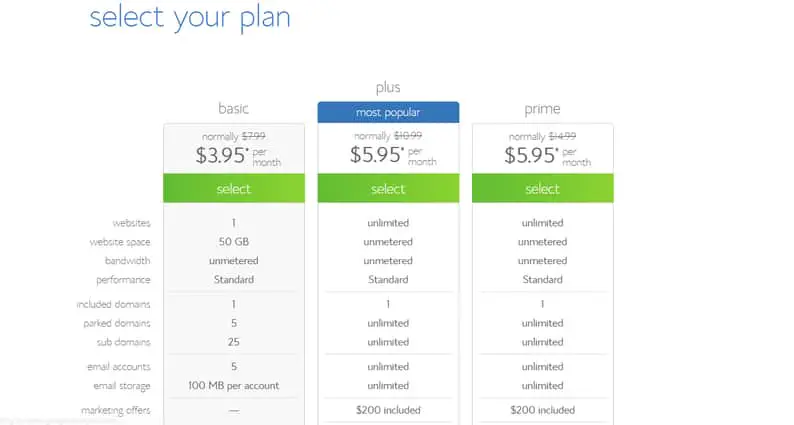
The next step is to select a plan. You have three options. There’s basic, plus and prime.
Start with basic if you are only building one website. You can always upgrade later.
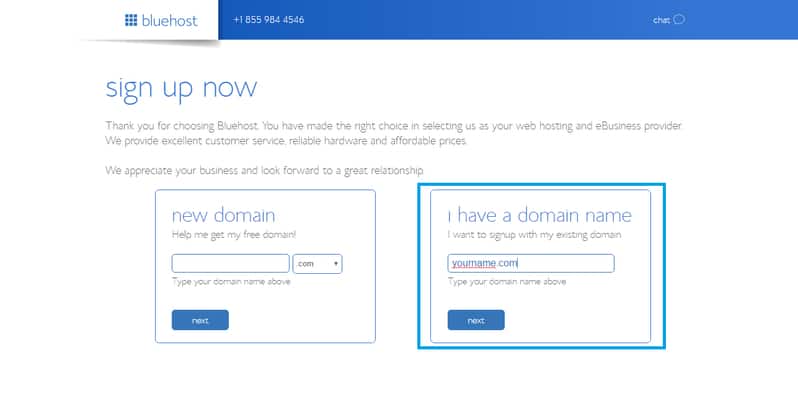
Since you already setup a domain with Godaddy, you need to choose the box that says “I have a domain name” and enter your domain name. Click Next.
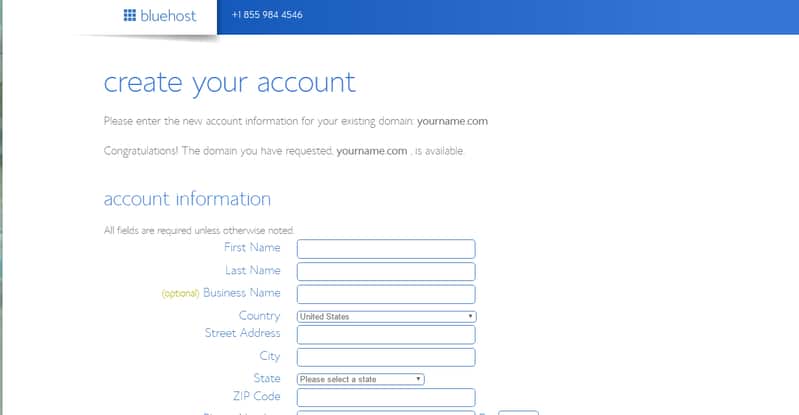
Clicking on next button will give you the “create your account” screen. It will ask questions to complete your profile.
Just make sure to complete the required fields and once completed, find the Submit button on the bottom to complete the purchase.
(Note: Bluehost hasan incredible customer service that’s available 24/7, so if you have any questions about any of these steps or anything about your website, you can call them anytime.)
Congratulations! You are now halfway done setting up your custom self-hosted WordPress website and blog.
3. Set Up WordPress
The third step is to install WordPress with your web host. Since you are adding a brand new domain, you’ll need to add the domain in the Control Panel (called cPanel) of your Bluehost account first.
On the hosting login screen, enter the domain name or your username and your password.
Click on submit.
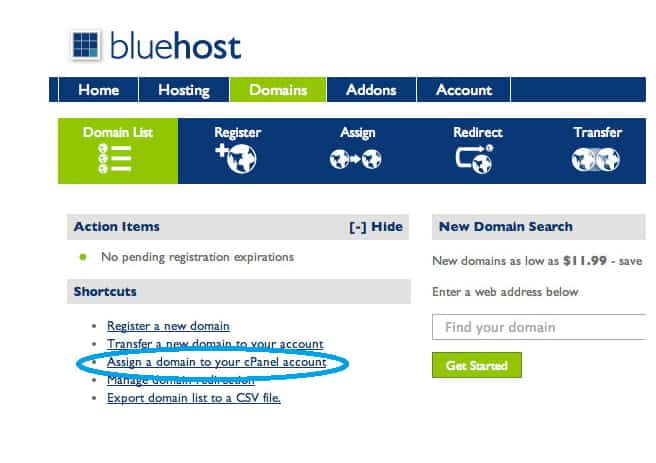
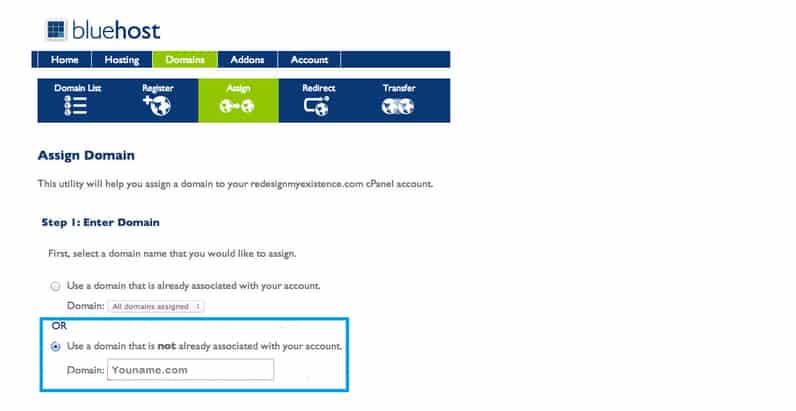
Once logged in, click on the Domains > Domains List tab and under Shortcuts click the link that says, “Assign a domain to your cPanel Account.”
On the Assign a Domain screen, click on the option, “Use a domain that is not already associated with your account” and enter your domain name.
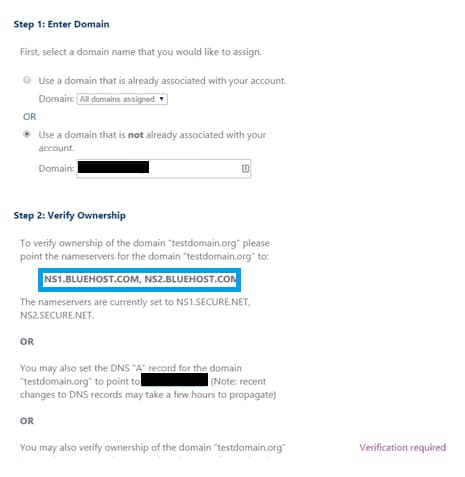
The next step is to “Verify Ownership” of the domain by pointing the nameservers for the domain to your new web host’s nameservers.
It’s not as complicated as it sounds. All you’re doing is just copying and pasting the nameservers (a simple text string something like ns1.bluehost.com and ns2.bluehost.com) from Bluehost into your Godaddy account.
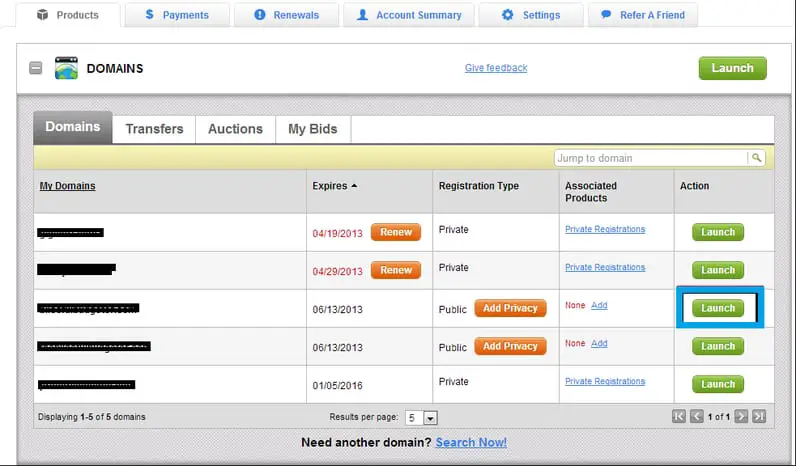
Go back to www.godaddy.com and log in to your account. Once logged in, just go up to the Products > Domains tab and click on the Launch button on the same row as the domain that you are trying to setup with Bluehost.
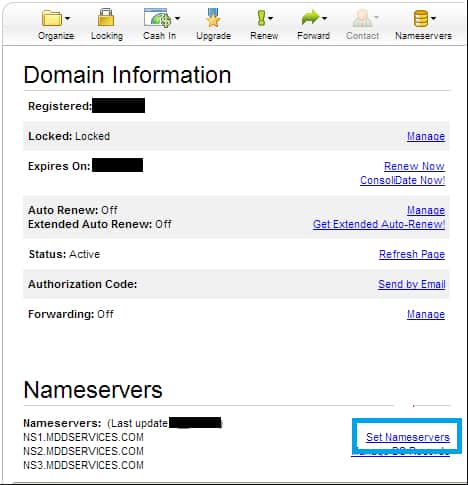
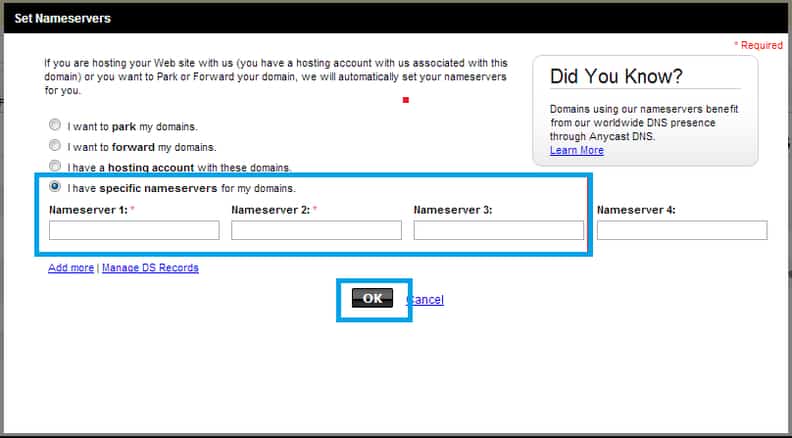
This launches the “Domain Information” window. This is where you’ll find the link to Set Nameservers. Click on that link to open the “Set Nameservers” window.
Go back to the Bluehost “Assign Domain” screen and copy the two nameservers listed under “Step 2: Verify Ownership”
Now that you have the nameservers information, go back to the Godaddy “Set Nameservers” window and choose the option “I have a specific nameserver for my domains.”
Place the information in the text box labeled “Nameserver 1” and “Nameserver 2” and click OK.
Once you click on OK, this will verify the ownership for your domain. It may take about 5 minutes in most cases.
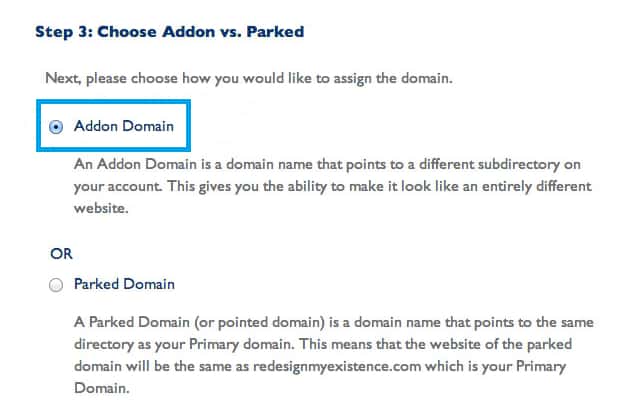
The next step is to choose between Addon or Parked. An Addon domain is a domain name that points to a different subdirectory on your account while a Parked domain is a domain name that points to a different subdirectory as your Primary domain.
I recommend clicking on “Addon Domain” because it lets you make it look like an entirely new website.
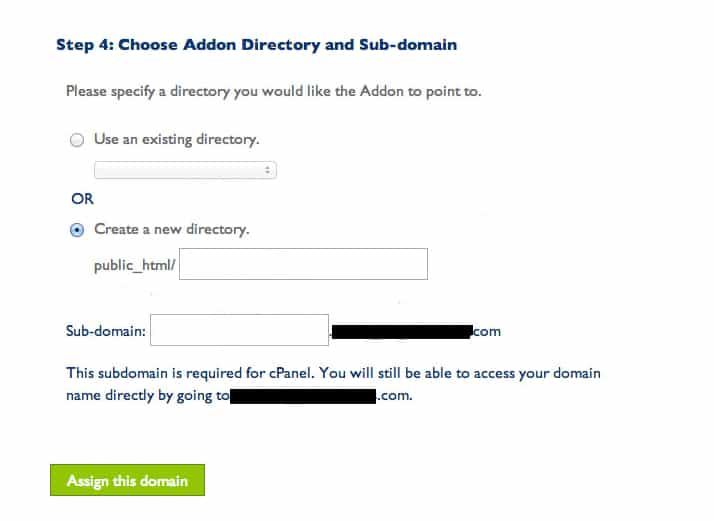
For the next step, choose the folder in your account that the domain will point to.
You basically need to tell Bluehost whether you wish to host your new website in an existing directory (meaning a folder on the server) or in a new directory.
If you don’t know what any of this tech stuff means, just click “Create a new directory.”
Click on Assign this domain button to finish the process.
Awesome!
You now have your domain server pointing to Bluehost. That means Bluehost is now hosting your domain in their servers, so technically your website is already live!
Now it’s time to setup WordPress so you can build a website customized to your needs for free using WordPress themes and plugins.
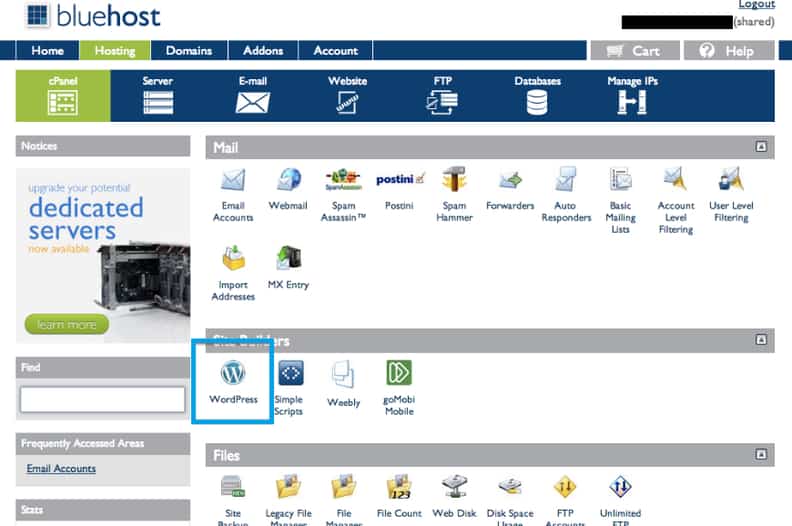
From the Control Panel of Bluehost, click on the Hosting > cPanel tab.
You’ll see under Site Builders, “WordPress” — just click on it.
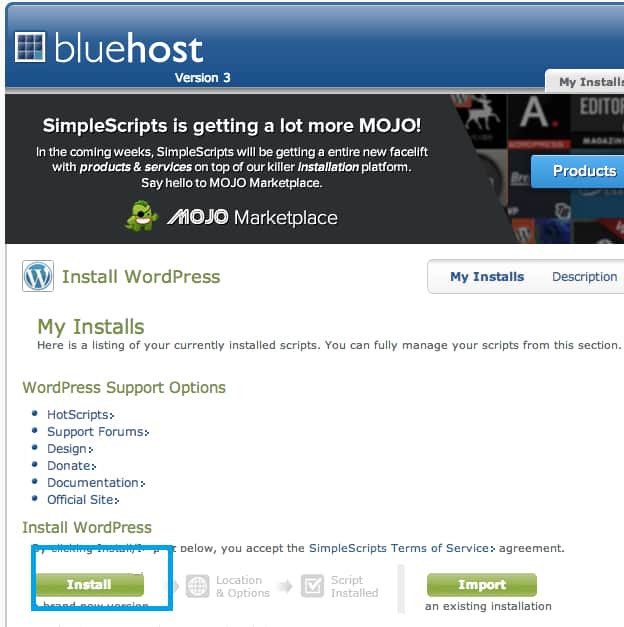
The next screen you’ll see is “Install WordPress.”
This is for a new installation and so we’ll need to click the Install button.
We now have to complete the installation of WordPress.
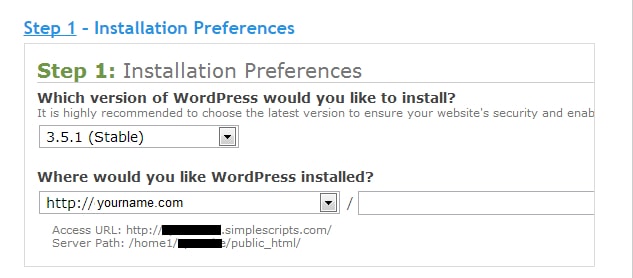
The first step is to select your Installation Preferences.
On the section that says “Where would you like WordPress installed?” you can select to install it either on the homepage or on your blog.
So if you want your homepage to be something different—if you want your homepage to be a sales page for your book, or something like a squeeze page—then you can choose to install it only on yourname.com/blog. Most people just want the entire website to be the blog, and there are also many free and paid tools you can use to change the home page later on.
You can leave the “/” blank and you can just install WordPress directly on your domain (this is the option I recommend for 95% of folks, especially if this is your first website).
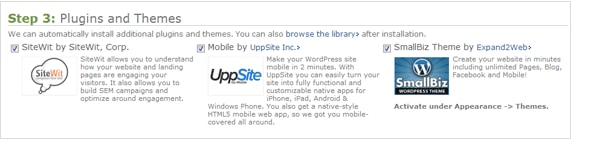
On “Step 3: Plugins and Themes,” you will find options for Plugins and Themes that you can install on WordPress. You can either select or deselect these options. If you choose to install the plugins, you can always uninstall them later.
Personally, I don’t recommend any of the current themes or plugins being offered at this stage by BlueHost.
The last thing you need to do is to accept the terms and conditions by checking the box that says, “I have read the terms and conditions of the GPLv2 license agreement.” Then Click on Complete.
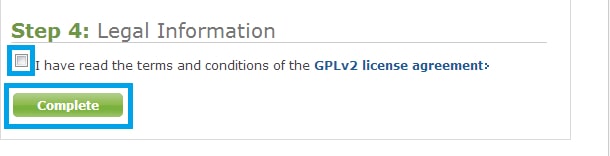
You’re now done installing WordPress.
Great work!
After you install WordPress, you’re going to get an email from SimpleScripts with the subject “WordPress Access Information”. This e-mail will contain your domain WordPress log in page.
It’s going to be something like www.yourname.com/wp-admin. The email will also include your login name and your login password which you can change to your preference at any time.
Now that you have WordPress set up, it’s time to write and post for your first blog article.
4. Write Your First Blog Post
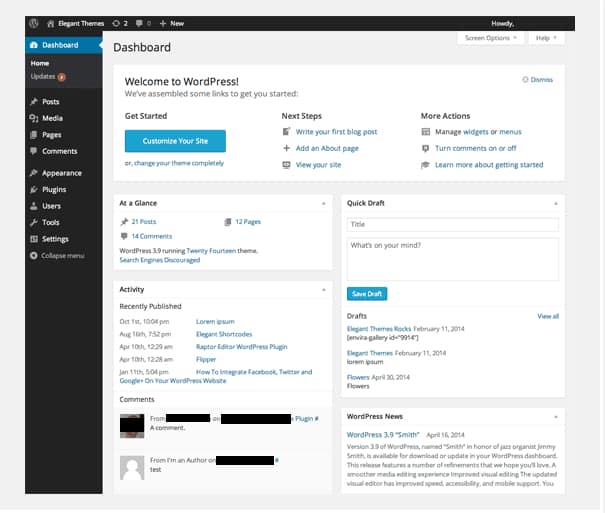
To write your first blog post, go to your WordPress login page (this will almost always be at www.yourdomain.com/wp-admin), enter your Username and Password and click on Log In.
The Dashboard (wp-admin) is the first screen you see when you login to the administration area of your blog. This is where you can get at-a-glance an overview of what’s happening with your blog.
You won’t see much yet since your website is brand new, and that’s okay.
To add your first post, scroll to Posts and choose “Add New.”
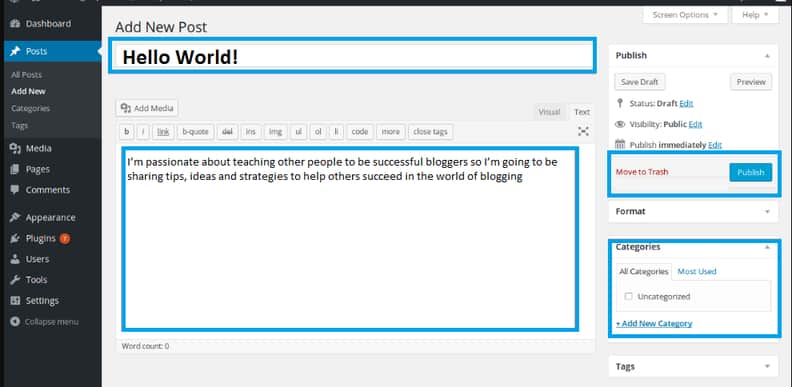
Enter the title and type your article into the big text box. The post title will determine the title of the blog post as it appears on your site, and the bigger box is where the body of your blog post will be written.
Once you have written your first blog post, just click on Publish and you’re finished.
Welcome to the blogosphere!
Tips for a Successful Website
Whether you’re an author or a business owner, here are some tips that can help you to build a
Reflect Your Brand
Your website must build your image and brand. Having a brand helps your audience understand who you are, what to expect from you, and what makes you different from other authors.
Brand elements on your website include not only visual features such as your logo and color schemes, but also the written content on the website.
Your brand tells readers who you are and what you stand for, and gives them a reason to want to learn more about you and your work. It should be an authentic reflection of who you are and the work you do.
To start off, be clear about your brand by asking questions such as:
- Who are you as an author/business and a person?
- What kind of books do you write? Thrillers? Mystery? Romance?
- What do you want your audience to know about you?
- What do you stand for? Is there a particular message you want to convey to readers?
- Who is your audience?
- How are you different from the competition?
Once you answer these questions, you will have a good idea of your brand image and can start incorporating elements of your brand into your website.
Create an Author Bio Page
The About page is also an opportunity for you to show your personality and make that emotional connection with your website visitor.
Rather than creating a dry biography, use your writing skills to create one that reflects your personality. You don’t have to list everything you have done since childhood or even talk about all your achievements. Remember, when website visitors are reading your biography page they are also thinking: “What’s in it for me?”
So stay on track and write in your own voice as you tell your story and paint a picture of your personality. Start with an intriguing hook and finish off with a great call-to-action—such as joining your mailing list or buying your latest book.
It’s a good idea to have a short and a long biography. Usually, your short bio should be on your homepage so that new visitors and fans get an idea of who you are. Journalists are also likely to use your short bio as the first paragraph of their article. The more extended version is for fans who want to know more about you.
We’ve written a detailed guide on how to write an Author Bio, so check that out while working on your About page.
Also, don’t forget to add a great profile picture. Get your photo professionally taken and make sure it gels with the overall image you want to project for your book or business.
Add Social Proof
“Social proof is the phenomenon where people do things that they see others doing. They often assume that other people understand more about the situation then they do,” explains Search Engine Journal.
Essentially, when your website visitor reads a review of your book or business by a prominent magazine, they are more likely to become a future customer.
Social proof builds trust and goes a long way in establishing your authority and credibility.
Add social proof on your Homepage, About Page, Book Page, and even on the sidebar if you have one.
Take a look at Ann Handley’s website. Ann is a writer, digital marketing pioneer, and Wall Street Journal best-selling author.
As soon as you land on her homepage, you will notice the authority she demands through various elements such as a video of Ann talking at The Digital Summit, snippets of her achievements such as “Named #1 of 7 people shaping modern marketing,” and logos of prominent clients.
Build Your Mailing List
One of the primary functions of your website is to convert website visitors into leads and buyers. These are the people who will be your ardent fans, share your new releases and other information on social media, attend your book signing events, give reviews on Amazon, and buy your books.
You can build your mailing list by offering them something of value for free such as tutorials, courses, or PDF downloads.
Perhaps you can offer a sign-up discount on your next book or a sneak preview to the first few chapters of your next book. If you write a blog, then encourage them to sign up for blog updates or a monthly newsletter, and let them know about new book releases and specials.
Tell Them Where They Can Find You
Create a contact page with a tab on the main menu bar so that it’s easy to contact you within seconds of visiting your website.
Here, visitors can fill out relevant information in a contact form to get in touch with you. Make sure the form is simple and that you do not ask too many unnecessary questions.
If you are on social media, then add those links on your website so that people can connect with you on social platforms.
Create a Media Kit
A media kit is a collection of all the relevant information about you on one page so that journalists, bloggers, reviewers, and marketing people can write about you.
It’s about making it easy for them to find information about you. So include your short biography, a list of all your works, and professional quality photos they might need to write an article about you.
Include any previous mentions you’ve received from the press or online, add any reviews or testimonials you have received, and also include them as links and downloads.
Remember to include your contact information such as your email address so they can get in touch with you.
Got Website Questions?
Want to learn even more about building a profitable website? Sign up for our step-by-step video training course on How Build Your Website Like a Pro.
P.S. If you have any questions about any of these steps or setting up your website, just post your comments below and we’ll be happy to help you get all the info you need to succeed!
Did you find this post helpful? Let us know in the comments below!
If you enjoyed this post, then you might also like:
Tom Corson-Knowles is the founder of TCK Publishing, and the bestselling author of 27 books including Secrets of the Six-Figure author. He is also the host of the Publishing Profits Podcast show where we interview successful authors and publishing industry experts to share their tips for creating a successful writing career.

I tried once to set up a web page but did not succeed in doing so. This article has inspired me to try again, basically because I have at hand my first completed fiction manuscript which is yet to be published, and I was thinking very hard on how best to profit from it. Thank you.
Hi Arthur, I hope the article helps you as you try again! Let us know if you have any questions :)
having struggled with my word press author’s website for yrs, I avoid even looking at it, and I SHOULD (your article inspired me. thanks!) to make at least a few improvements such as have sep. short and long bios, and a special page for press kit, as well as find places to mention my fcbk pages… have to get back to the sep. e email address I have tried to maintain for contacts, without affecting my personal email; sometimes I can’t even get access to that website linked email address,(might miss out on contacts I should follow up on… sigh, will have to take a deep breath and jump in once again) thanks for the kick in the but
We’re glad the article inspired you to get back into your website, Afiena! Let us know if you have any questions :)
OMG. I tried to do everything suggested in your article, but a lot of your information must be outdated because the bluehost site didn’t look anything like in your screenshots. The prices are also quite a bit higher, and bluehost is forcing me to upgrade in order to do the Addon. Ugh! I am so frustrated right now, and am spending more than planned. Help!
I am not a published author yet, but I aspire to be. If I publish my work (poetry and autobiographical essays) on my blog, can they be stolen and/or plagiarized by someone else? Thank you in advance for your answer!
Hi Scherron, that’s technically a possibility, but I wouldn’t let that stop you. Since it’s personal, it’s highly unlikely, and you could send them a notice to take it down if that does happen.
wow, this is really valuable information, just what I was looking for, and you explain it simply (yet detailed) so well. I can see you put a lot of effort into it, so “thank you.” I haven’t yet, but I plan to refer to this diligently when I get started with creating my own author website/blog. Though I only have one book published thus far, I’m in the process of trying to get reviews for it, as well as publishing/writing others, so setting up a website is essential. It’s something I’ve been meaning to do for a long time, but just didn’t know how and never got around to it. Once again, “thanks.”
I’m so glad you found the post helpful, Dennis! Best of luck with your books and marketing efforts :)
God bless and reward you greatly for your diligence and generosity towards teaching others. Appreciate the great efforts put into this tutorial, and others as well.
We’re glad you found the tutorial helpful! :)