 If you’re writing a book and need to create an index, this article will tell you everything you need to know—from tips and tricks for identifying the best terms to include, to step-by-step instructions for using Microsoft Word’s indexing feature.
An index is a critical, yet often undervalued, piece of many nonfiction books, especially information-dense books like reference books, self-help and advice books, textbooks, and cookbooks. A good index will ultimately make your book more useful, easier to navigate, and will ensure that your readers refer back to your book time and time again.
Creating an Index
For very complex projects, it is best to hire a professional indexer, but if you’re self-publishing your book on a budget, you can definitely do it yourself. If you plan to publish your book using Microsoft Word and want to create an index, Word’s indexing feature is a good option.
(Note: If your book will not be published in Word, or will be laid out in a different program, do not create your index in Word. The page numbers won’t transfer.)
Word’s built-in indexing feature can make your job a whole lot easier, but it won’t do all the work for you. To create a great index, you have to know a thing or two beyond the mechanics of marking entries.
If you simply want a tutorial on how to create an Index in Word, you can jump to the bottom of this post. But if you’re a first-time indexer, or if you’re looking for a bit of extra guidance on how to create a high-quality index, read on for simple tips that will make your book stand out in the crowd.
Index Research
Before you start creating your index, take a look at books that are similar to yours in length, topic, and/or style. Read through some of their index entries carefully. Try using the index to find different things in the book.
Pay special attention to how the index is laid out:
- How are the entries formatted? How are they worded?
- What types of words are included in the index?
- Can you easily find what you’re looking for?
Familiarizing yourself with the style and language of good indexes will help enormously when it comes time to make your own.
When thinking about your index, it’s helpful to keep the following concepts in mind:
1. Save It for Last
An index should be the absolute last thing you do when writing a book. There’s nothing more frustrating than carefully crafting an index only to have to re-do the entries when changes are made to the copy.
Once your copy is final, you can begin creating your index. While some writers like to mark index entries throughout the editorial process, leaving this task until the very end has a few distinct benefits:
- You don’t have to weed out entries that are no longer relevant. It’s easier to create new entries than to sift through existing entries to ensure they still make sense.
- You can use it as a “last look” at your copy to catch lingering errors. No matter how much review your manuscript has endured, there are always small ways to improve it or additional mistakes to catch.
- You can think about the book as a whole. When deciding on cross-references, subentries, and the like, you’ll benefit from a familiarity with all of the content—not just a small piece of it.
2. Consider the Length
Depending on how many columns you use for your index (and the size of your type), the number of characters you can reasonably fit in each entry will vary. Very long entries will almost always look strange and be hard for readers to follow. Keep each entry as short and concise as you can.
While there is no “correct” page count for an index, you should use your judgment as to what makes sense:
- If your book 600 pages long, but your index is only 2 pages, the index is probably too sparse to be truly useful.
- Conversely, if you have a 25-page index for a book that is only 100 pages long, try to condense it—your index shouldn’t be a quarter of the length of your book!
3. Put Yourself In Your Readers’ Shoes
An index is worthless if it isn’t user-friendly. While creating index entries, you should always be thinking about the ways in which a reader might use your index.
For example, if you are writing a book about dog breeds, having an index entry for “dogs” is too broad and not very helpful—it would probably lead the reader to every page in the book! However, including index entries for each breed will help readers discover the information that is most valuable to them.
You may also want to include alternative terms and synonyms, even if they aren’t directly mentioned in the copy.
For example, if you have a section on the best dog breeds for families with children, you will probably include an entry that looks like this:
children, best dogs for, 30
Your reader, however, may be looking for the word “kids” instead of “children.” If space permits, include both terms in your index (using cross-references) to make it as easy as possible for your reader to find what they need. (See below for more on formatting index entries and using cross-references.)
Of course, some restraint is required—you can’t (and shouldn’t) include every synonym of every word in your index. Put yourself in your readers’ shoes, and try to include terms that you feel readers are most likely to look for.
Finally, while it’s not essential, it’s a good idea to include entries for general concepts that may not directly appear in the text, but which could still be useful for a reader. To return to the dog breeds example, the term “mixed breed” may not be used in the copy, but would make a good header for other terms such as Golden Doodle or Maltipoo.
The Rules of Index Entries
Indexes are not simply alphabetical lists of words or terms that appear in a given text. In order to be useful, index entries should be formatted to be as user-friendly and intuitive as possible. Here are some rules to follow when creating your own index entries.
1. Use nouns the reader is likely to look for
Whenever possible, index entries should begin with nouns or noun phrases.
Let’s think back to our book on dog breeds, and the reader trying to find out which dog breeds are good for children. To find that information, that reader is most likely going to look in the index for concrete nouns such as “children,” “kids,” or “family.”
The reader is unlikely to find the exact term “best dogs for children,” since adjectives are simply too subjective to be helpful index categories.
To make the phrase “best dogs for children” searchable, it needs to be inverted so that the noun comes first: “children, best dogs for.”
Also note that the spelling of all index entries should match what appears in the text—for example, if a term is hyphenated in the copy, it should also be hyphenated in the index.
2. Use lowercase letters
Index entries are not capitalized unless they are referencing proper nouns.
3. Use subentries to make things easier to find
Not every entry needs subentries, but if you find that a main entry has a lot of page references that could be frustrating for a reader to sift through, subentries can be helpful.
For example, if you have an index entry for “terriers” that has a dozen page references, you might create subentries for “Airedale Terrier,” “Bull Terrier,” “Miniature Schnauzer,” “Russell Terrier,” etc., to help point the reader to exactly what they’re looking for.
4. Set image references in bold or italics
Images, including figures and tables, should be included in the index. To indicate that a page reference leads to an image, the page number (not the whole entry) should be set in bold or italics (you can choose this option when creating entries in Word).
Be sure to include a note at the top of the index to tell readers what the bolded or italicized numbers mean. For example, “Page numbers in italics refer to images.”
5. Use cross-references as needed
Including synonyms in an index is remarkably helpful for readers, but you don’t need to include all the page references in both places.
Choose which word you’d like to use as your “main” term, and treat that as you would any other entry, marking it each time it appears in the text. For the synonymous term(s), you can simply mark it once and cross-reference the main term to re-direct your readers (Word’s tools make this very easy to do).
6. You don’t need to include everything
Resist the urge to include terms that appear only once, have little to do with the main topic, or that readers are unlikely to search for. These will only make your index seem long and cumbersome.
For example, if you mention that your childhood dog enjoyed playing in the snow, you do not need to add an index entry for “snow.”
There are also a few items that never need to be included in the index:
- Basic front matter, such as title pages, dedications, epigraphs, or tables of contents
- Acknowledgments
- Bibliographies, references, further reading lists, image lists, or glossaries
- Source citations in footnotes or endnotes (Note: If the footnotes or endnotes elaborate on concepts in the main text, they should be indexed.)
- Other in-text citations
- Author names that are concealed under ‘et al.’ in citations
How to Create an Index in Word
Microsoft Word’s indexing feature is fairly simple to use and will generate an alphabetized index with (basic, though customizable) formatting.
Step 1: Paginate
First, make sure your document is paginated. An index won’t do a reader any good if there are no page numbers to refer to.
To do this, go to Insert, then select Page Number. Choose your formatting preferences and click OK.

Step 2: Mark Basic Entries
Starting at the very beginning of your manuscript, comb through the text for a term you’d like to index. Highlight the term, go to the References tab, and, under the Index section, click on Mark Entry.

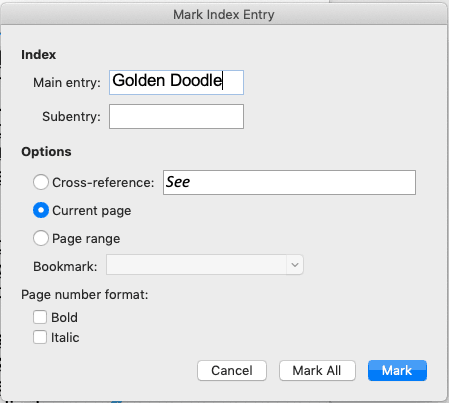
This will bring you to a dialog with several options. You can edit the text in the main entry box so that it reads the way you would like the index entry to read.
For a simple, repeated, main entry term, you can select Mark All to auto-index every occurrence of that exact term.
If you would like to mark only this occurrence of the term, select Mark.
Once you have made your selection, you will see the bracketed XE notation(s) appear in the text to denote the index entry (or entries). If you do not want these to be visible, go to the Home tab and click on the paragraph symbol.

Step 3: Mark Special Entries
To create different types of index entries, choose the appropriate options from the Mark Entry dialog.
If you would like to create a second-level subentry, you can do so using the subentry box. To create a third-level subentry, follow the subentry text with a colon.
To create a cross-reference, select cross-reference under options and type in the entry to which you would like to direct your readers.
To create an image, table, or figure reference, highlight the image and click Mark Entry. The dialog will come up blank; you can fill in the appropriate entry text and then select bold or italic under the page number format section.
Repeat this process until you have marked all of your entries. Note that you can select the same piece of text as many times as you’d like to create multiple index entries for it (for example, “Golden Doodle” might appear as a main entry and also as a subentry for “mixed breeds.”)
Step 4: Insert Index
When you are ready to insert the index into your document, click where you would like the index to be.
In the Index section of the References tab, click Insert Index.

In the Index dialog box, you can select your preferred format, style, number of columns, and page number alignment. Click OK, and your index should appear.
Step 5: Review Your Index and Make Changes
Take a close look at your newly created index. Make sure everything is spelled correctly, that the entries make sense, and that you don’t have any entries with an excessive number of page references.
If you need to go back and make changes, simply locate the XE fields for the entries you’d like to change and modify the text in the quotes. You can also remove entries by selecting the whole XE field (including the brackets) and pressing delete on your keyboard.
When you’re done making changes, click anywhere in the index, return to the Index section in the References tab, and click Update Index.
For an overview of this process, check out our simple video tutorial on how to make an index in Word.
Get Help from Readers
Once you have finished your index, have a few friends test-drive it. They may zero in on a term you didn’t include, or give you a heads-up that a certain topic was hard to find.
And be aware: Even with the help of Word’s tools, making a good index takes time and effort, and lots of it. Take comfort in knowing that your effort will pay off, and your readers will thank you.
Have you ever made an index for a book? What problems did you run into? Let us know in the comments below.
If you liked this article, you might also like:
- How to Create a Glossary in Word
- How to Format Your eBook for Kindle
- Nonfiction and Fiction Formatting Templates for Kindle
- Formatting Your eBook with a Mac
- 18 Microsoft Word Tips and Tricks
Melissa Drumm is a lifelong book lover. She is passionate about helping authors make their work the best it can be. You can find some of her writing here on the TCK blog, and learn more about her other projects at melissadrumm.com. When she’s not writing, editing, or reading, you’ll usually find her in the kitchen, baking.

I have created the index and yet, when I create the indexing for a word or term that is in the Endnotes, I can’t figure out how to automatically get the indication that the term is in the Endnotes, that is, with the letter “n” indicating which endnote. For example ..
Darwin, Charles …… 235n16 —-which indicates, that Darwin can be found on page 235, endnote number 16.
I should also not that for a couple of terms in the Endnotes section, it did appear, but I can’t figure out what I did or how that happened.
Thanks.
Hi Bob, that’s a good question. I don’t think most books include terms from the endnotes in the index, but I’ll research a little more and see if I can find any tricks for that.
Dear Kaelyn Barron,
While I try to add second or third subentries (the first goes very well) to the same Main, I get the ‘answer’: No index entries were marked. I am trying every possible way and always get the same. How do I solve it? Would be most grateful for your help. Yaacov
Hello Yaacov, could you try doing it on another computer or a different version of windows? It might be the software that’s causing it. If you still can’t solve the problem, I recommend presenting it to the Microsoft community.
I am practiciing indexing with a document – when I try and delete an index item by highligting and deleting the (XE “word”) it does not dissapear after i hit update index. Do I have to go to each refererence of the word and delete it?
Thanks for you help. Great tutorial
Hi David, I’m not really familiar with indexing, but I looked it up and the answer wasn’t very clear about whether you need to delete every entry, but I’ll try to find an answer for you!
working on a 460+ page technical document, with numerous reference terms on every page. I made it to page 4 indexing and started getting this message with every new entry marked: “The documents is too large to save. Delete some text before saving.” Does this indicate the reference function of Microsoft Word doesn’t work to create a large index or a long book?
Hi Miki, do you have a lot of images or graphics? I’m not really sure, but that could be part of the issue
Had the same problem. Had to split the book into two new files. .Marked them to index.
Then, had to print out the indexes, copy and past both indexes into a new document consecutively, hit A-Z button on the ribbon to alphabetize, then manually put both instances of the same name – let’s way Westby, pages 25, 70, 204 and Westby pages 340 420 560 together – by deleting the middle name. Good luck!
Can you please let me know how to indicate an entry appears in a footnote, e.g., 250n (rather than 250)? Thank you
Hi Mary, I’m not sure if I understand the question, but you might find what you need in our footnotes post. If that doesn’t answer your question please let me know :)
I have a very specific problem with this. In MS Word (Mac) I begin the page numbering in my book (page 1) on the 7th page of the book (I used the “section break” to accomplish this). Then I built my index. But when I “insert index” – it automatically resets (!) the book numbers – so the numbering now begin on the very first page of the book. I’m frustrated. Melissa – can you help me?
Hi Wayne, thanks for your comment! I’m really not sure, but will do some research and try to find an answer for you.
How do I cut out the preliminary pages (Table of Contents, Preface, etc.) that have Roman numerals, such as i, ii, iii, iv, … from the Index? Should I leave the preliminary page in tnhe Index?
Hoping you can give me some guidance.
How would I do the index for a book with 8 chapters? I need to submit each chapter separately but would like the index to include keywords throughout the book.
Hi Donna, as long as you have the entire document saved in one piece somewhere, you should still be able to create an index with keywords found throughout the whole book. I hope that answers your question, if not please let me know!
Hi, you mentioned that for complex projects that a professional indexer should be considered. How can I find one to work with?
Hi Gary, I would recommend searching freelancer sites like Upwork or Fiverr. You can find strong talent there and negotiate rates. Hope that helps!
An excellent source is the Indexer Locator maintained by the American Society for Indexing. You can review experience, skills, qualifications, subject expertise and contact information for several professional indexers all in one place.
https://www.asindexing.org/find-an-indexer/asi-indexer-locator/
Nice and precise note on a topic that many assumed indexing is so complex. You simplify indexing.
Thank you.
Thanks for your comment, Aemero! We’re glad you found the post helpful :)
How do I tyoe the word “Index” at the top of the first page or column of the index
Hi Karen, I’m not sure, but I think you just have to type it manually above the section break where your index starts. If you use a Heading style it will be included in your document’s Table of Contents