
A table of contents is an essential part of many nonfiction books, making it easier for readers to navigate your book. Creating a table of contents (TOC) in Microsoft Word is easy. In this article, we’ll walk you through four easy steps to making a TOC in Word.
If you’re planning to distribute your book in both eBook and print formats, you will need to modify your TOC slightly for each format—page numbers for your print layout, and links for your eBook layout. Don’t worry—we’ll show you how.
Making a Table of Contents in Microsoft Word
Making your TOC requires just a little-bit of know-how—but if you set it up correctly, the program does most of the heavy lifting for you.
Make sure your book is as close to complete as it can be before creating your TOC. This will help you avoid having to re-do your TOC later.
Here is what you need to know to create a TOC.
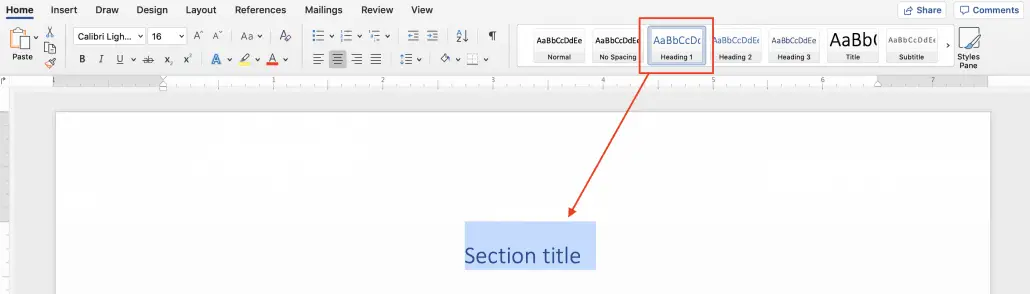
Step 1: Format Your Headings
The first thing you’ll need to do is make sure your section and chapter heads are properly formatted.
To do this, highlight each section or chapter title and, under the Home tab in the Style section, apply the Heading 1 style.
You can customize the heading style by right-clicking on the style pane and adjusting your preferences in the dialog.
For especially long books, or in books with chapters that cover multiple, distinct topics, you may also want to mark subheads with Heading 2. This will allow your readers to pinpoint exactly what they’re looking for.
Step 2: Create a Blank Page for Your Table of Contents
Your table of contents should fall after the title page, copyright page, dedication page, and epigraph, if you have one, but before the foreword, preface, and/or introduction.
(Note: The pages that come before the TOC, e.g. the dedication and the epigraph, should NOT be included/referenced in the TOC.)
To insert a blank page in the appropriate spot, place your cursor at the point just before you would like your TOC to appear (for example, at the end of the epigraph). Then, go to the Insert tab and click Blank Page.

Step 3: Create Separate Print and eBook Files
At this point, you’ll want to create two versions of your document: One of these will become your print book and one will become your eBook.
Name your files accordingly, for example “Book Title_print” and “Book Title_ebook.”
Each document will get a slightly different TOC. The steps are very similar, except for a few key elements.
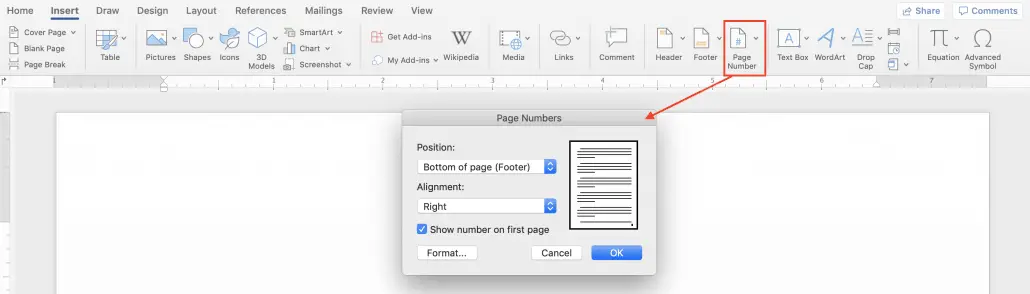
Step 4A: Create Your Print Book TOC
In your print document, you’ll want to add page numbers so that your TOC entries can lead readers to a specific page.
To add page numbers, go to Insert, then click Page Number. Select your formatting preferences in the dialog.
Next, make sure your cursor is placed where you would like your TOC to appear. Go to the References tab, click on Table of Contents, and select Custom Table of Contents from the dropdown menu.

In this dialog, you can choose the style of your TOC, as well as a few important options. Since this is for our printed book, you’ll want to select the checkbox for “show page numbers.”
If you would like your page numbers to be right-aligned, select that box as well. (If you choose right-aligned numbers, you can also choose your “tab leader,” the stylistic element that visually connects the TOC entry with the page number.)
If you choose to include sub-headings (Heading 2) in your TOC, put a “2” in “Show levels.” If you want to include chapter names (Heading 1) only, put a “1” there.
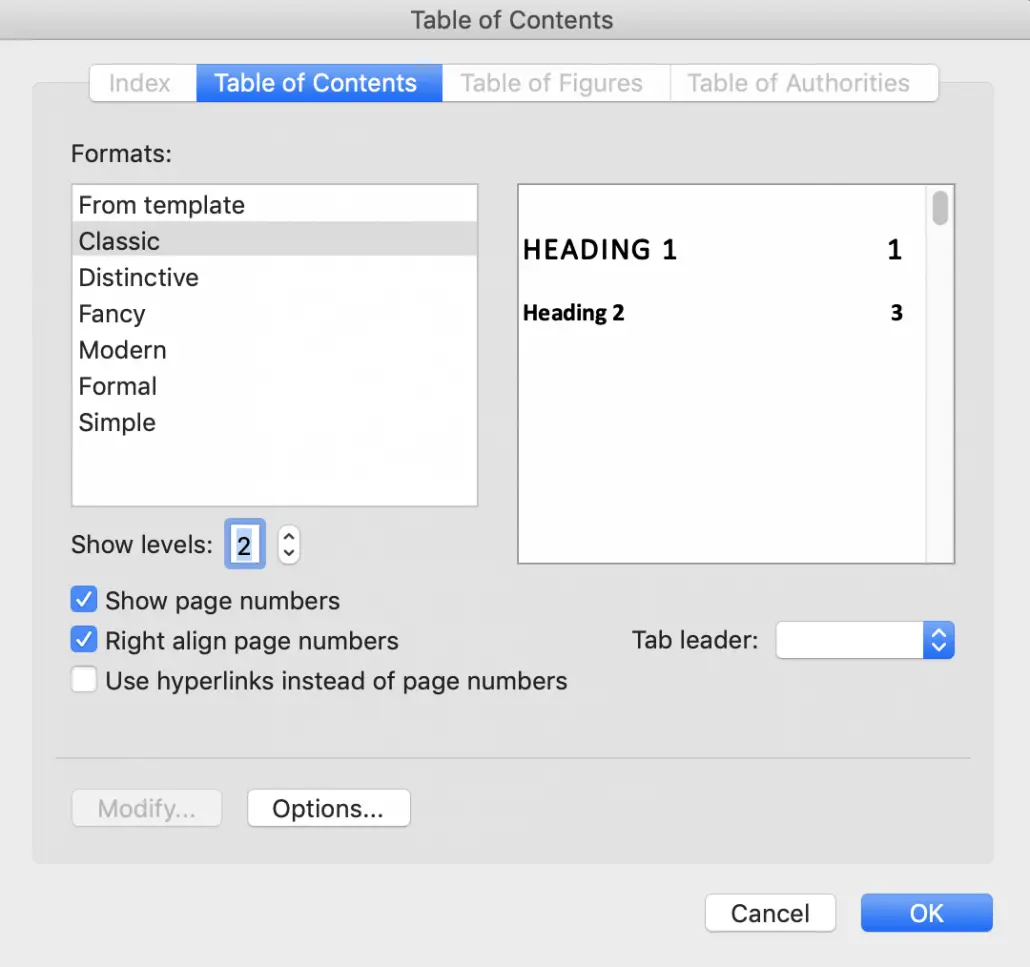
Click OK, and your TOC will appear in your document.
Step 4B: Create Your eBook TOC
Since eBooks do not have page numbers, the process for creating a TOC for an eBook is slightly different.
(You can also check out our complete guide to formatting eBooks.)
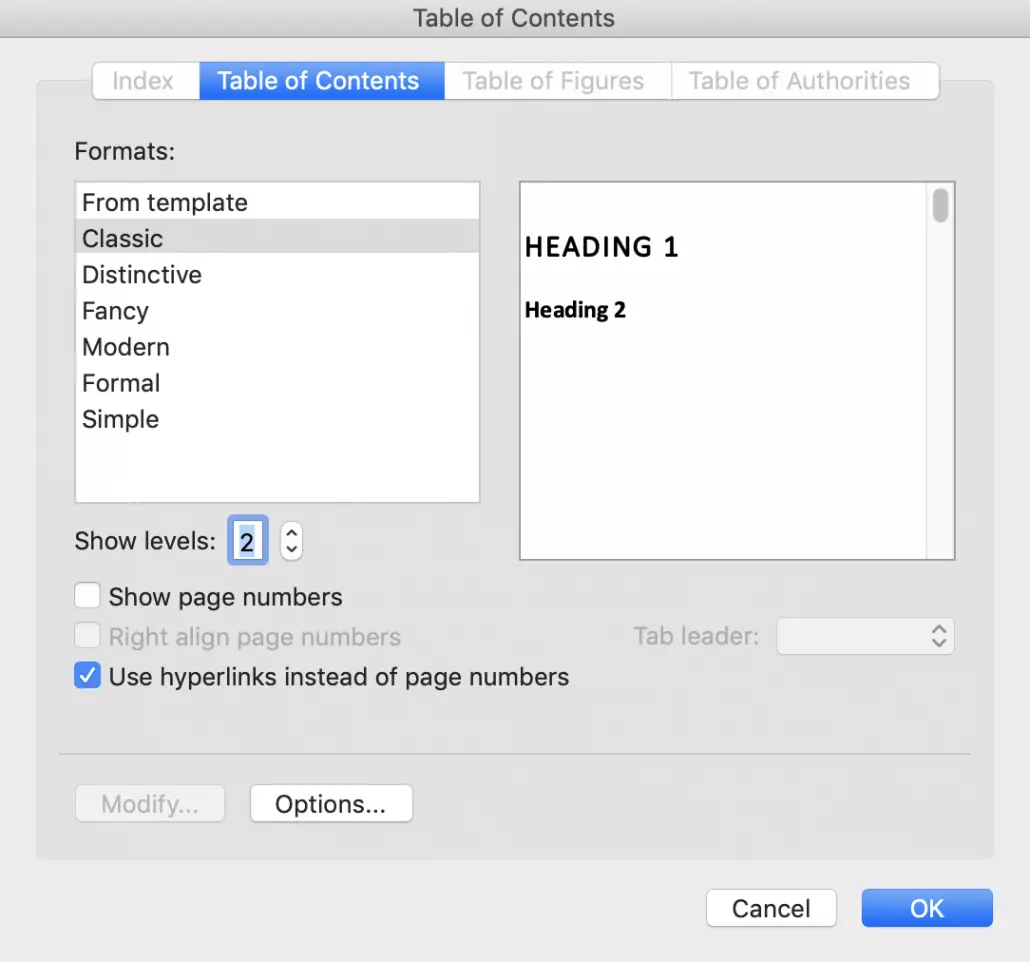
Since your headers have already been marked, you’re ready to insert your TOC. Click your cursor where you would like your TOC to appear, then go to Table of Contents under the References tab and click Custom Table of Contents.
This time, you’ll want to make sure the box next to “show page numbers” is not checked. Instead, check the box next to “Use hyperlinks instead of page numbers.”
Select the appropriate number of levels, and then hit OK.
Check that your hyperlinks work. If they work in Word, they’ll work on e-readers!
A Table of Contents Helps Readers in Any Genre
Making a TOC in Word is simple and will make your readers’ lives easier, so we recommend it for most nonfiction books. While novels don’t usually have a TOC, you should include one in collections of short stories or poems as well as in anthologies.
You can find more Microsoft Word tutorials here:
- How to Make a (Really Good) Book Index in Word
- How to Create a Glossary in Word
- How to Write an Appendix
- How to Format Your Book for Amazon Kindle Using Microsoft Word in Only 30 Minutes
Melissa Drumm is a lifelong book lover. She is passionate about helping authors make their work the best it can be. You can find some of her writing here on the TCK blog, and learn more about her other projects at melissadrumm.com. When she’s not writing, editing, or reading, you’ll usually find her in the kitchen, baking.

Hi Kaelyn,
I am indie publishing my first trilogy as a bookset (ebook). I have included the original book covers at the beginning of each of the three novels. The hyperlinked table of contents on the Kindle Previewer does register those pages but describes them as “unknown”. Is there a way for me to correct the term so it reads “Book 1” instead of “unknown”?
Thanks for your guidance!
Hello
I have these 4 amazing short stories that I have written, all on my Nokia 1, using Word. It’s 79 pages long. I uploaded it to KDP to be converted to ebook. But I keep gettinga a feedback from KDP saying “Table of Contents missing.” Since I don’t have a computer, I would like to know if I can make a table of contents using the Word app on my phone, which I used to write the 4 short stories?
Hi Mfundo, this article might help you.